 IDP Plugin Development Manual
This document is designed for plugin developers, providing a complete Zadig IDP plugin development guide to help you quickly build and publish custom plugins.
# What is the IDP Plugin System
# IDP (Internal Developer Platform) Overview
The Internal Developer Platform (IDP) is a unified platform for development teams, aiming to:
- Reduce Cognitive Load: Developers can focus on business development without worrying about underlying infrastructure
- Improve Development Efficiency: Provide standardized toolchains and self-service capabilities
- Unified Development Experience: Integrate scattered development tools and provide a consistent interface
- Consolidate Best Practices: Transform enterprise development experience into reusable capabilities
# Value of the Plugin System
Zadig's plugin system provides powerful extension capabilities for building enterprise-level IDP:
- Feature Extension: Extend system functionality through plugins to meet personalized needs
- UI Customization: Customize navigation menus and business pages to enhance user experience
- Enhanced Integration: Integrate third-party tools and services for richer functionality
- Flexible Configuration: Support enabling and disabling plugins as needed
# Use Cases
# Scenario 1: Toolchain Integration
Background:
Enterprises typically use multiple development tools, requiring developers to frequently switch between different systems, resulting in low efficiency.
Solution:
Integrate commonly used tools into the Zadig platform through plugins:
- Code Review Integration: GitLab MR Viewer, GitHub PR Management
- Quality Monitoring Integration: SonarQube code quality reports, test coverage display
- Monitoring and Alerting Integration: Prometheus metrics display, Grafana dashboard embedding
- Collaboration Tools Integration: Jira task boards, Feishu/DingTalk message center
# Scenario 2: Standardize Development Process
Background:
Different teams have inconsistent development processes, resulting in high onboarding costs for new members and collaboration difficulties.
Solution:
Standardize enterprise development processes through plugins:
- Release Approval Process: Custom approval plugins to standardize release procedures
- Code Standard Checking: Integrate Lint tools to automatically check code standards
- Documentation Template Plugin: Provide standardized technical documentation templates
- Environment Request Plugin: Unified test environment request and management process
# Scenario 3: Data Insights and Decision Making
Background:
Managers lack development efficiency data, making it difficult to identify bottlenecks and optimization directions.
Solution:
Develop data display and analysis plugins:
- Development Efficiency Dashboard: Key metrics such as delivery cycle, deployment frequency, change failure rate
- Team Health: Code commit activity, code review efficiency analysis
- Resource Usage Analysis: Environment resource consumption, cost analysis
- Quality Trend Report: Bug trends, test pass rate, technical debt analysis
# Scenario 4: Enterprise-Specific Features
Background:
Each enterprise has unique business scenarios and management requirements that general platforms cannot fully meet.
Solution:
Develop customized plugins based on enterprise characteristics:
- Compliance Checking: Security audits and log retention for financial industry
- Multi-Cloud Management: Unified management and switching of hybrid cloud environments
- Cost Optimization: Cloud resource cost analysis and optimization suggestions
- Knowledge Base Integration: Internal technical documentation and best practices library
# Plugin Type Description
Zadig plugins support two main types to meet different usage scenarios:
# Navigation Page (Page)
Characteristics:
- Independent functional page with complete page layout
- Appears in the system sidebar menu
- Has an independent URL access path
Applicable Scenarios:
- Functions requiring full page display (such as MR list, data dashboard)
- Relatively independent features that do not depend on specific business context
- Complex features requiring deep interaction
Examples: GitLab MR Viewer, Development Efficiency Dashboard, Code Quality Report
# Tab
Characteristics:
- Tab component embedded in existing pages
- Displayed in the tab area of business directories
- Depends on parent page context information
Applicable Scenarios:
- Extend existing page functionality (such as project details page)
- Functions requiring business context (such as project-level quality reports)
- Lightweight information display
Examples: Project Quality Tab, Environment Configuration Tab, Deployment History Tab
# Development Environment Setup
# System Requirements
Developing Zadig plugins requires the following environment:
- Node.js: >= 20.0.0
- npm: Installed with Node.js
- Modern Browser: Supporting ES6+ syntax (Chrome, Firefox, Safari, Edge, etc.)
# Install Development Tools
# Global Installation of CLI Tool
# Install zadig-plugin-cli globally
npm install -g zadig-plugin-cli-dev

# Verify installation
zadig-plugin --version
zadig-plugin --help
2
3
4
5
6
# Quick Start
# Step 1: Create Plugin Project
Create different types of plugins based on requirements:
# Create navigation page plugin
zadig-plugin create my-hello-plugin

# Create tab plugin
zadig-plugin create my-tab-plugin --type tab
2
3
4
5
Command Options:
-t, --type <type>- Plugin type (page, tab), default is page-f, --force- Force overwrite existing directory
# Step 2: Install Dependencies
# Enter project directory
cd my-hello-plugin

# Install dependencies
npm install
2
3
4
5
# Step 3: Development and Debugging
# Start development server
zadig-plugin dev
2
After the development server starts, you can view plugin effects in real-time in the browser and debug functionality. Code changes will automatically hot reload.
# Step 4: Build and Release
# Build production version
zadig-plugin build
2
After building, a plugin.js file will be generated in the project directory, which can be directly uploaded to the Zadig system.
# Plugin Development Implementation
# Page Plugin Code Template
Entry File Structure:
// src/index.js
export default {
  name: 'my-plugin',           // Plugin identifier
  displayName: 'My Plugin',    // Display name
  type: 'page',                // Type: page
  route: '/my-plugin',         // Route path
  component: MyPluginPage      // Main component
};
2
3
4
5
6
7
8
Complete Example:
// src/index.js
import './styles.css';

const MyPluginPage = {
  name: 'MyPluginPage',
  data() {
    return {
      data: [],
      loading: true
    };
  },
  async mounted() {
    await this.fetchData();
  },
  methods: {
    async fetchData() {
      try {
        const response = await fetch('/api/data');
        const result = await response.json();
        this.data = result;
      } catch (error) {
        console.error('Error fetching data:', error);
      } finally {
        this.loading = false;
      }
    }
  },
  template: `
    <div class="my-plugin-container">
      <h1>My Plugin</h1>
      <div v-if="loading">Loading...</div>
      <div v-else class="content">
        <!-- Business logic -->
      </div>
    </div>
  `
};

export default {
  name: 'my-plugin',
  displayName: 'My Plugin',
  type: 'page',
  route: '/my-plugin',
  component: MyPluginPage
};
2
3
4
5
6
7
8
9
10
11
12
13
14
15
16
17
18
19
20
21
22
23
24
25
26
27
28
29
30
31
32
33
34
35
36
37
38
39
40
41
42
43
44
45
# Tab Plugin Code Template
Entry File Structure:
// src/index.js
export default {
  name: 'my-tab-plugin',       // Plugin identifier
  displayName: 'Custom Tab',   // Tab display name
  type: 'tab',                 // Type: tab
  component: MyTabComponent    // Tab component
};
2
3
4
5
6
7
Complete Example:
// src/index.js
import './styles.css';

const MyTabComponent = {
  name: 'MyTabComponent',
  props: {
    context: {
      type: Object,
      default: () => ({})
    }
  },
  data() {
    return {
      info: null
    };
  },
  watch: {
    'context.projectName': {
      handler(newProjectName) {
        if (newProjectName) {
          this.loadProjectInfo(newProjectName);
        }
      },
      immediate: true
    }
  },
  methods: {
    async loadProjectInfo(name) {
      try {
        const response = await fetch(`/api/project/${name}`);
        const data = await response.json();
        this.info = data;
      } catch (error) {
        console.error('Error:', error);
      }
    }
  },
  template: `
    <div class="my-tab-container">
      <h3>Project Information</h3>
      <div v-if="info" class="info-content">
        <!-- Display project related information -->
      </div>
      <div v-else>No data available</div>
    </div>
  `
};

export default {
  name: 'my-tab-plugin',
  displayName: 'Project Info',
  type: 'tab',
  component: MyTabComponent
};
2
3
4
5
6
7
8
9
10
11
12
13
14
15
16
17
18
19
20
21
22
23
24
25
26
27
28
29
30
31
32
33
34
35
36
37
38
39
40
41
42
43
44
45
46
47
48
49
50
51
52
53
54
# Project Structure Specifications
# Standard Project Structure
my-plugin/
├── src/
│   ├── index.js          # Plugin entry file (required)
│   ├── App.vue           # Main component
│   ├── components/       # Components directory
│   │   ├── Header.vue
│   │   └── List.vue
│   ├── utils/           # Utility functions
│   │   ├── api.js
│   │   └── storage.js
│   ├── styles/          # Style files
│   │   └── index.css
│   └── constants/       # Constants
│       └── config.js
├── package.json         # Project configuration
├── plugin.config.js     # Plugin configuration (required)
└── README.md           # Documentation
2
3
4
5
6
7
8
9
10
11
12
13
14
15
16
17
# Plugin Configuration File
plugin.config.js is used to configure basic plugin information:
module.exports = {
  name: 'my-plugin',           // Unique plugin identifier
  displayName: 'My Plugin',    // Display name
  type: 'page',                // Plugin type: page or tab
  route: '/my-plugin',         // Route path (only for page type)
  description: 'Plugin description', // Plugin function description
  version: '1.0.0',            // Version number
  author: 'Your Name',         // Author information (optional)
  icon: 'icon-name'           // Icon name (optional)
};
2
3
4
5
6
7
8
9
10
# Entry File Specifications
src/index.js is the plugin's entry file:
import Vue from 'vue';
import App from './App.vue';
import './styles/index.css';

// Export plugin configuration and component
export default {
  // Plugin metadata
  name: 'my-plugin',
  displayName: 'My Plugin',
  type: 'page',

  // Plugin component
  component: App,

  // Lifecycle hooks (optional)
  onMount: () => {
    console.log('Plugin loaded');
  },
  onUnmount: () => {
    console.log('Plugin unloaded');
  }
};
2
3
4
5
6
7
8
9
10
11
12
13
14
15
16
17
18
19
20
21
22
# Development Standards and Best Practices
# 1. Code Standards
# Component Development
// UseVue2 components and Options API
export default {
  name: 'MyComponent',
  data() {
    return {
      data: []
    };
  },
  async mounted() {
    // Data loading logic
    fetchData();
  },
  template: `<div><!-- Component content --></div>`
};
2
3
4
5
6
7
8
9
10
11
12
13
14
# Style Management
/* Use CSS modularization or unified prefix to avoid style conflicts */
.my-plugin-container {
  padding: 20px;
}

.my-plugin-header {
  font-size: 18px;
  font-weight: bold;
}
2
3
4
5
6
7
8
9
# 2. Responsive Design
Plugins should adapt to different screen sizes:
/* Mobile adaptation */
@media (max-width: 768px) {
  .my-plugin-container {
    padding: 10px;
  }
}

/* Tablet adaptation */
@media (min-width: 769px) and (max-width: 1024px) {
  .my-plugin-container {
    padding: 15px;
  }
}
2
3
4
5
6
7
8
9
10
11
12
13
# 3. Error Handling
Implement proper exception handling with user-friendly error messages:
async function fetchData() {
  try {
    const response = await fetch('/api/data');
    if (!response.ok) {
      throw new Error('Failed to load data');
    }
    const data = await response.json();
    return data;
  } catch (error) {
    console.error('Error:', error);
    // Show error message to user
    showErrorMessage('Error loading data, please try again later');
  }
}
2
3
4
5
6
7
8
9
10
11
12
13
14
# 4. Performance Optimization
# Lazy Loading
// UseVue async components for lazy loading
export default {
  name: 'App',
  components: {
    HeavyComponent: () => import('./HeavyComponent.vue')
  },
  template: `
    <div>
      <HeavyComponent />
    </div>
  `
};
2
3
4
5
6
7
8
9
10
11
12
# Debounce and Throttle
// Use debounce to optimize search input
export default {
  name: 'SearchInput',
  data() {
    return {
      query: '',
      timer: null
    };
  },
  methods: {
    handleSearch(value) {
      // Clear previous timer
      if (this.timer) {
        clearTimeout(this.timer);
      }
      // Set new timer
      this.timer = setTimeout(() => {
        this.performSearch(value);
      }, 300);
    },
    performSearch(value) {
      // Perform search logic
      console.log('Search:', value);
    }
  },
  template: `
    <input
      v-model="query"
      @input="handleSearch(query)"
      placeholder="Enter search keyword"
    />
  `
};
2
3
4
5
6
7
8
9
10
11
12
13
14
15
16
17
18
19
20
21
22
23
24
25
26
27
28
29
30
31
32
33
# 5. User Experience
# Loading State
export default {
  name: 'DataList',
  data() {
    return {
      loading: true,
      data: []
    };
  },
  template: `
    <div>
      <div v-if="loading" class="loading-spinner">
        Loading...
      </div>
      <div v-else>
        <!-- Data display -->
      </div>
    </div>
  `
};
2
3
4
5
6
7
8
9
10
11
12
13
14
15
16
17
18
19
# Empty State
export default {
  name: 'DataList',
  props: {
    data: {
      type: Array,
      default: () => []
    }
  },
  methods: {
    handleRefresh() {
      this.$emit('refresh');
    }
  },
  template: `
    <div>
      <div v-if="data.length === 0" class="empty-state">
        <p>No data available</p>
        <button @click="handleRefresh">Refresh</button>
      </div>
      <div v-else>
        <!-- Data list -->
      </div>
    </div>
  `
};
2
3
4
5
6
7
8
9
10
11
12
13
14
15
16
17
18
19
20
21
22
23
24
25
# 6. Data Persistence
Use browser local storage to save user configuration:
// Utility functions
const storage = {
  set(key, value) {
    localStorage.setItem(
      `zadig-plugin-${key}`,
      JSON.stringify(value)
    );
  },

  get(key) {
    const value = localStorage.getItem(`zadig-plugin-${key}`);
    return value ? JSON.parse(value) : null;
  },

  remove(key) {
    localStorage.removeItem(`zadig-plugin-${key}`);
  }
};

// Usage example
function saveConfig(config) {
  storage.set('config', config);
}

function loadConfig() {
  return storage.get('config') || {};
}
2
3
4
5
6
7
8
9
10
11
12
13
14
15
16
17
18
19
20
21
22
23
24
25
26
27
# API Calling Specifications
# Calling Zadig API
// API call wrapper
class ZadigAPI {
  constructor() {
    this.baseURL = window.location.origin;
  }

  async request(endpoint, options = {}) {
    const url = `${this.baseURL}/api/aslan${endpoint}`;
    const response = await fetch(url, {
      ...options,
      headers: {
        'Content-Type': 'application/json',
        ...options.headers
      },
      credentials: 'include' // Include authentication information
    });

    if (!response.ok) {
      throw new Error(`API Error: ${response.status}`);
    }

    return response.json();
  }

  // Get project list
  async getProjects() {
    return this.request('/api/aslan/project');
  }

  // Get workflow list
  async getWorkflows(projectName) {
    return this.request(`/api/aslan/workflow/v4?projectName=${projectName}`);
  }
}

export default new ZadigAPI();
2
3
4
5
6
7
8
9
10
11
12
13
14
15
16
17
18
19
20
21
22
23
24
25
26
27
28
29
30
31
32
33
34
35
36
# Calling External API
// Call external service API
async function fetchGitLabMRs(gitlabUrl, token) {
  const response = await fetch(`${gitlabUrl}/api/v4/merge_requests`, {
    headers: {
      'Authorization': `Bearer ${token}`
    }
  });

  if (!response.ok) {
    throw new Error('Failed to fetch GitLab MRs');
  }

  return response.json();
}
2
3
4
5
6
7
8
9
10
11
12
13
14
# Debugging Tips
# 1. Development Environment Debugging
# View detailed logs when starting development server
zadig-plugin dev --verbose

# Specify port
zadig-plugin dev --port 3000
2
3
4
5
# 3. Log Output
// Development environment logs
if (process.env.NODE_ENV === 'development') {
  console.log('Debug info:', data);
}

// Unified log management
const logger = {
  info: (message, data) => {
    console.log(`[INFO] ${message}`, data);
  },
  error: (message, error) => {
    console.error(`[ERROR] ${message}`, error);
  },
  warn: (message, data) => {
    console.warn(`[WARN] ${message}`, data);
  }
};
2
3
4
5
6
7
8
9
10
11
12
13
14
15
16
17
# Plugin Release
# Build Production Version
# Execute build
zadig-plugin build

# Verify build artifact
ls -lh plugin.js
2
3
4
5
# Upload to Zadig
- Log in to Zadig system
- Go to System Settings → Plugin Management
- Click New Plugin
- Fill in plugin information:
- Plugin Name: Display name
- Plugin Type: Select page or tab
- Route Path: URL path (for page type)
- Plugin Description: Function description
- Plugin Status: Enable/Disable
- Upload
plugin.jsfile - Click Create Plugin
# Version Management
It is recommended to follow semantic versioning:
- Major Version: Incompatible API changes
- Minor Version: Backward-compatible feature additions
- Patch Version: Backward-compatible bug fixes
// plugin.config.js
module.exports = {
  name: 'my-plugin',
  version: '1.2.3', // Major.Minor.Patch
  // ...
};
2
3
4
5
6
# Plugin Marketplace
Official Plugin Repository
GitHub: https://github.com/koderover/zadig-idp-plugins
Welcome to contribute and share your plugins
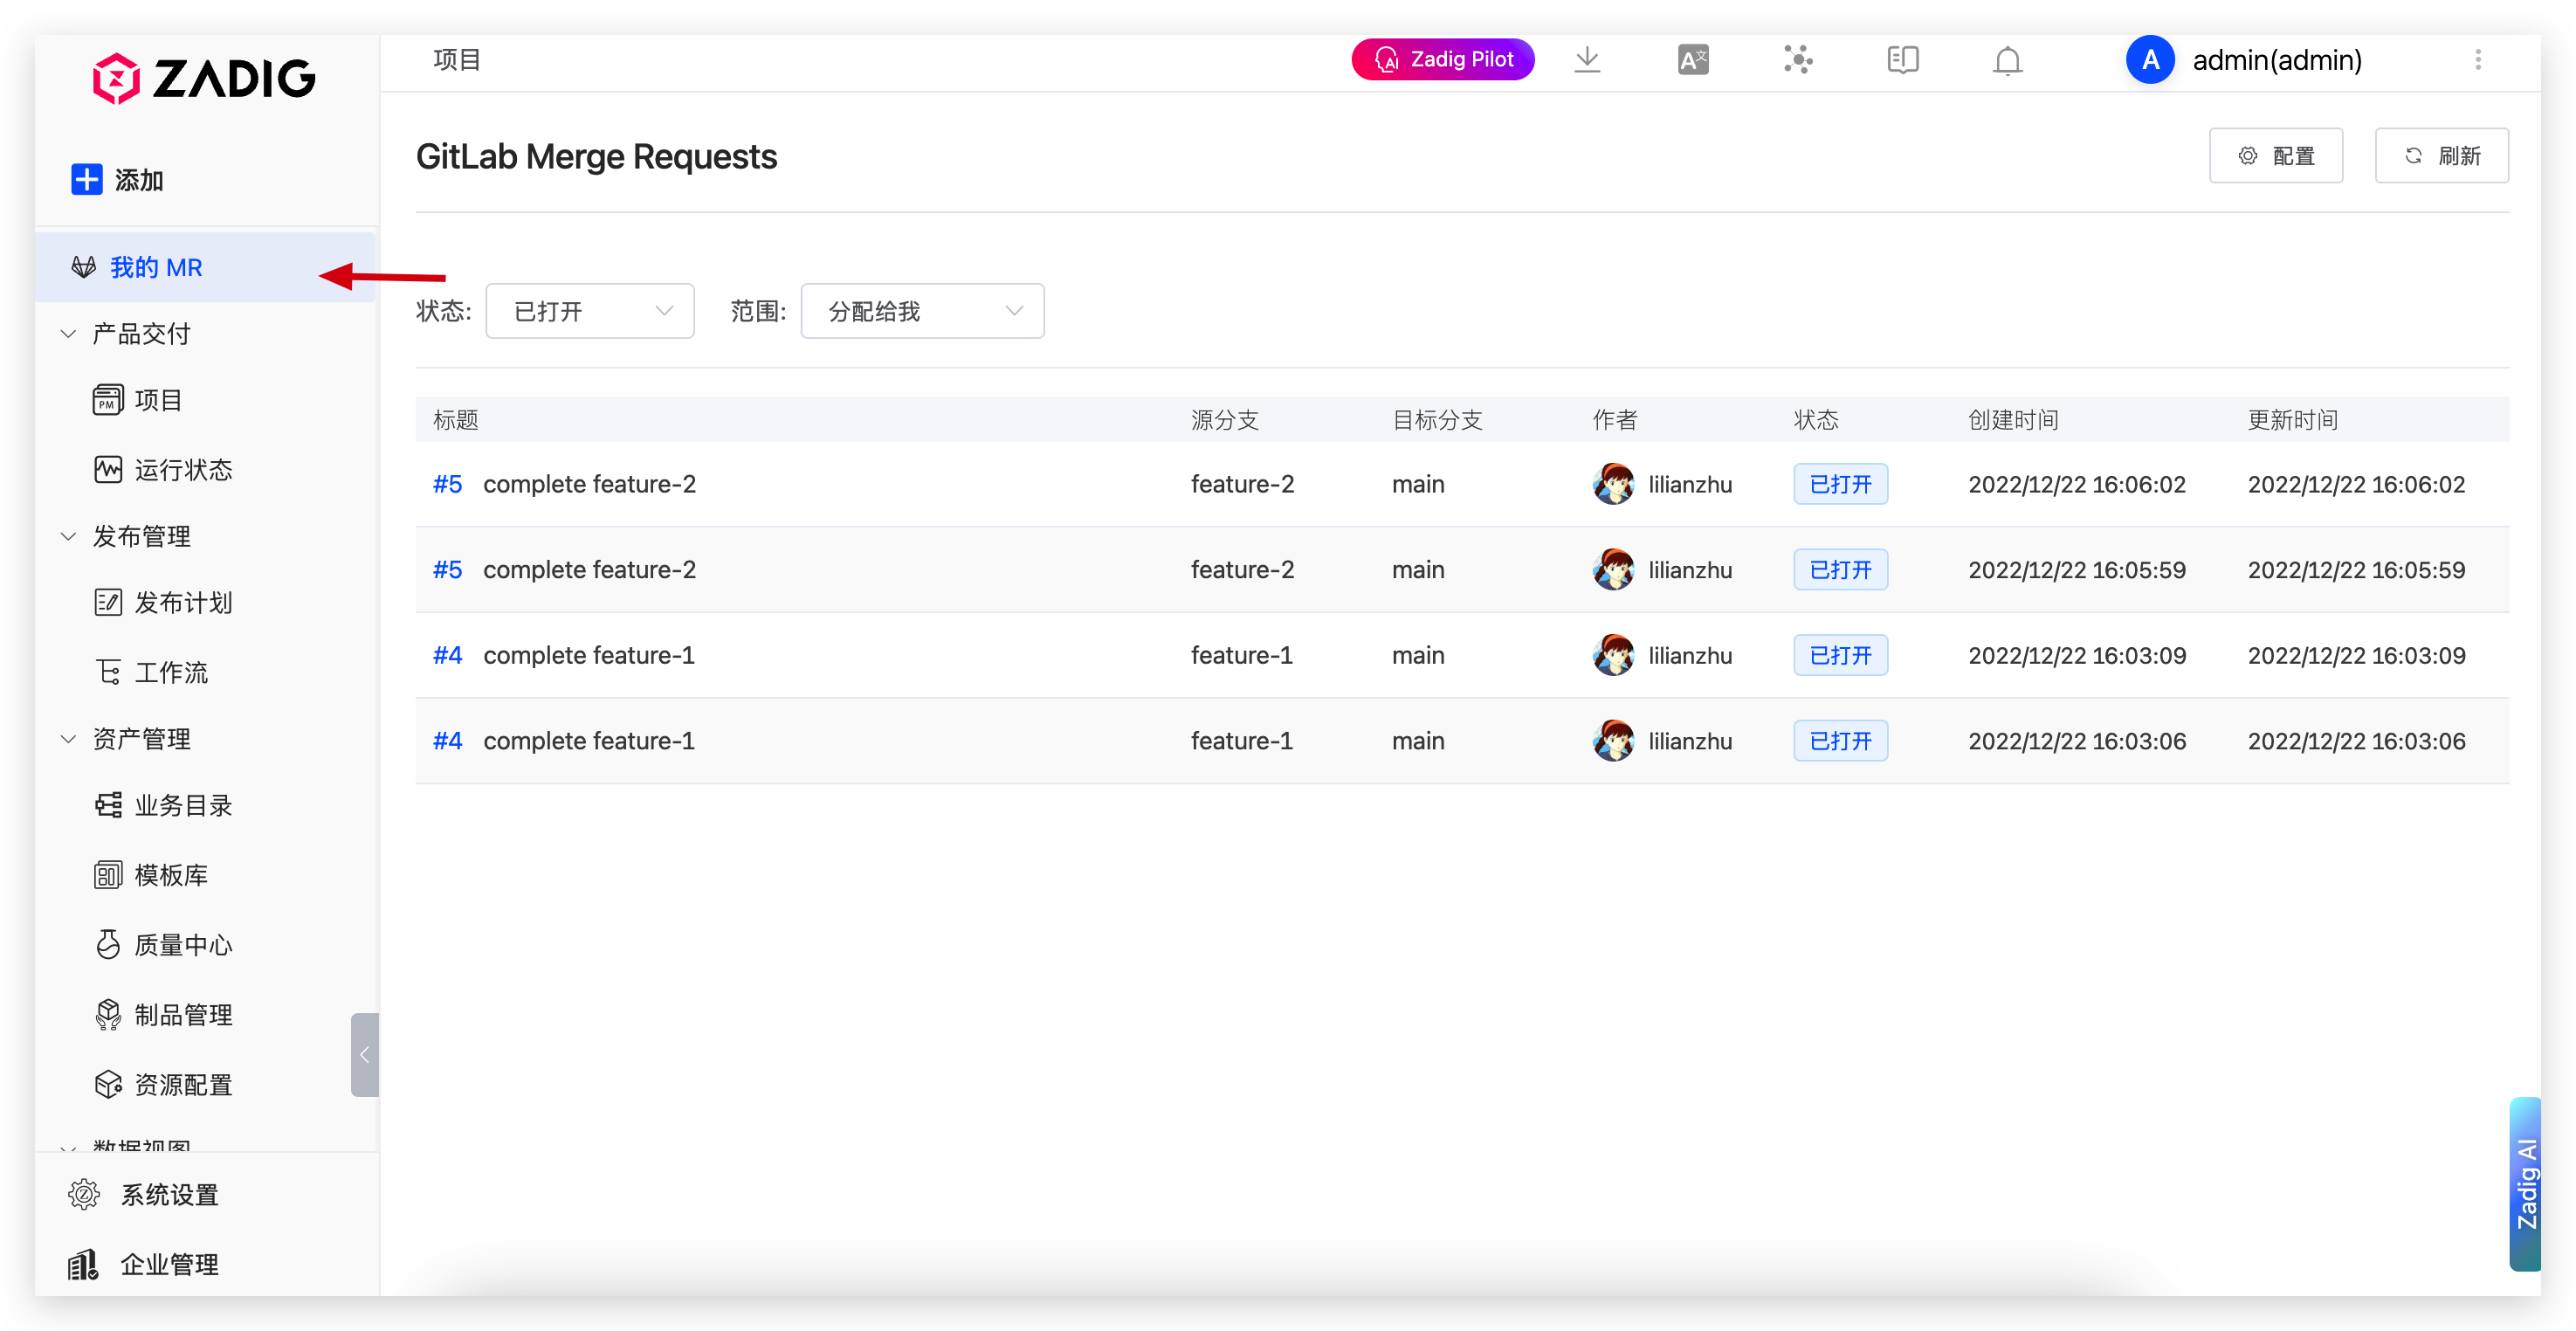
# GitLab MR Viewer
An official example plugin demonstrating how to integrate external systems.
Features:
- View Merge Requests assigned to me
- Filter MRs by status and scope
- Support for GitLab.com and private instances
- Local configuration management, data security
How to Get:
# Download from official plugin repository
git clone https://github.com/koderover/zadig-idp-plugins.git
cd zadig-idp-plugins/gitlab-mr-viewer

# Build plugin
npm install
npm run build

# Upload plugin.js to Zadig
2
3
4
5
6
7
8
9
Configuration Instructions:
- Obtain GitLab Personal Access Token (requires
apiandread_userpermissions) - Fill in GitLab URL and Token on plugin configuration page
- Save configuration after successful connection test
More Plugins: Visit the official plugin repository for more examples: https://github.com/koderover/zadig-idp-plugins
# FAQ
# Build Related
# Q: Build fails with Node version incompatibility error?
A: Check and upgrade Node.js version:
# Check current version
node --version

# Upgrade using nvm (recommended)
nvm install 20
nvm use 20

# Reinstall dependencies
rm -rf node_modules package-lock.json
npm install
2
3
4
5
6
7
8
9
10
# Q: Build artifact is too large?
A: Optimize build configuration:
- Remove unused dependencies
- Use code splitting
- Compress resource files
- Check if development dependencies are mistakenly packaged
# Development Related
# Q: Development server fails to start?
A: Troubleshooting steps:
- Confirm you are in the correct plugin project directory
- Check if
package.jsonandplugin.config.jsexist - Ensure project dependencies are installed:
npm install - Check if port is occupied, try specifying another port:
zadig-plugin dev --port 3001
# Q: Plugin cannot load in Zadig?
A: Checklist:
- Verify that
plugin.jsfile is correctly generated - Check browser console for JavaScript errors
- Confirm plugin configuration information is complete
- Check if plugin type and route configuration are correct
# Q: How to debug uploaded plugins?
A:
- Open browser developer tools
- View error logs in Console tab
- Monitor API requests in Network tab
- If modifications are needed, rebuild and upload new version
# API Related
# Q: Zadig API call returns permission error?
A:
- Ensure authentication information is included in request:
credentials: 'include' - Check if current user has appropriate permissions
- Verify API endpoint path is correct
# Q: Cross-origin request blocked?
A:
- Zadig API calls should use relative paths to avoid CORS issues
- External API calls require target server to support CORS
- Consider proxying external APIs through Zadig backend
# Style Related
# Q: Plugin styles conflict with system styles?
A:
- Use unique CSS class name prefix, such as
.my-plugin-* - Consider using CSS Modules
- Avoid using global styles
- Use CSS-in-JS solutions (such as styled-components)
# Development Resources
# Official Resources
- Plugin Repository: https://github.com/koderover/zadig-idp-plugins(opens new window)
- Example Code: Official plugin repository contains multiple complete examples
- API Documentation: Refer to Zadig OpenAPI documentation
# Community Support
- GitHub Issues: Submit issues and feature requests
- Technical Support: Contact Zadig technical support team
- Contribution Guide: Welcome to contribute quality plugins to the official repository
